How to
Make Kehilalinks Pages

Introduction
In this lesson we will learn how to insert and manipulate pictures.
Pictures in web pages must be digital images. You can create digital
images in software, or by using a scanner or digital camera. You can
also copy images from other web pages, but remember that copyright
laws apply!
Image Files
Many beginning web page designers are surprised to learn that images
are stored in files that are separate from the text in a web
page. HTML has commands that tell browsers where and how to
display an image, but the computer data that actually makes up the
image is not HTML. Thus, one web page that has 100 different images
could consist of as many as 101 separate files.
The smallest unit of computer storage is called a "bit,"
which can have the values 0 or 1. All computer data,
including the letters in this sentence, are stored as groups of
bits. A group of eight bits is called a "byte." Most
measures of computer memory, file size, disk size, etc., is given
in terms of bytes, either thousands of bytes (kilobytes, or "K"
for short), millions of bytes (megabytes, or "M" for short), or
billions of bytes (gigabytes, or "G"). [Technically, and
originally, a kilobyte is 1024 bytes (210 bytes), a
megabyte is 1024 × 1024 bytes, etc. But many storage media vendors
and even several international organizations define a megabyte as
1000 × 1000 bytes, so no wonder we are all confused.]
Images that we see on our computer screen consist of small
colored dots, called "pixels." Typically, we refer to the size of
an image as "so many horizontal pixels by so many vertical
pixels," e.g., "800 by 300." 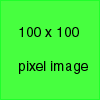 Each pixel,
however, depending on how many colors are in the image, can
potentially take up more than one byte of memory. If you
have a display that can show 256 colors, each pixel will require
one byte to store its color. If your display supports "high
color," each pixel will need 16 bits (2 bytes) to store its
color. If your display supports "true color," each pixel
will need 24 bits (three bytes) to store its color. Because
there are so many pixels in an image, and each pixel can take up
more than one byte, images can take up a lot of memory. For
example, a 100 by 100 image displayed in "high color" contains
10,000 pixels and could need 20,000 bytes (20K) of memory to
display -- and that's a pretty small image when you consider that
most screens today can display 1440 × 1080 or more pixels.
Each pixel,
however, depending on how many colors are in the image, can
potentially take up more than one byte of memory. If you
have a display that can show 256 colors, each pixel will require
one byte to store its color. If your display supports "high
color," each pixel will need 16 bits (2 bytes) to store its
color. If your display supports "true color," each pixel
will need 24 bits (three bytes) to store its color. Because
there are so many pixels in an image, and each pixel can take up
more than one byte, images can take up a lot of memory. For
example, a 100 by 100 image displayed in "high color" contains
10,000 pixels and could need 20,000 bytes (20K) of memory to
display -- and that's a pretty small image when you consider that
most screens today can display 1440 × 1080 or more pixels.
Image File Formats
When we view web pages, one of our concerns is how fast we can
download the web page from its server. Large images, you
have probably noticed, can take a long time to download.
Recognizing this, computer scientists have devised methods of
organizing and compressing the data in an image file so that it
takes fewer bytes to store and therefore can be downloaded more
quickly. These methods are referred to as "image
formats." The two standard image file formats that virtually
all web browsers can display are called "Graphics Interchange
Format" ("gif," for short) and "Joint Photographic Experts Group"
("jpg") format. There is also a newer format called "Portable
Network Graphics" ("png", for short), which is intended to replace
gif. Image formats other than gif and jpg (and png) may not be
displayable by all browsers.
The "gif" format (and "png" format) is commonly used for image files
that have relatively few colors and large areas of the same
color. The "jpg" format is used for photographs and other
images that have lots of smooth color gradations, called "continuous
tone images." For example, the green 100 by 100 image above
has 2 colors: green and black. The gif file takes less than 1K, but
the same image can take six times that much space if stored as a
"jpg" file! A photograph, on the other hand, that might take
20K if stored in jpg format, might be twice or three times as large
if stored as a "gif" file.So the choice of image format can greatly
affect the size of an image file.
Even using these formats, however, images can be huge. When
designing your web pages, try to reduce the size of each image
file as much as possible so your page will load faster.
Image Editing
Software
Composer can convert some formats, but not all, and no matter
what format your images are in you will want to be able to edit
them -- change the color or size, crop them, or make other
changes. To do these things you will need to use image editing
software. If you don't already have a program to do this, a
popular free graphics program for Windows is "Irfanview", or the
excellent Paint.NET.
Mac users have iPhoto, or can use the free, powerful (but
complicated to use) "Gimp", if iPhoto doesn't do the
trick. (Gimp also has a version that runs on Windows, if you don't
like Irfanview or Paint.NET.)
Be very careful if you install these programs. These are
free programs and the developers make money by getting sponsored
by other software vendors who try to get you to install their
software at the same time as you install the free ones. So you
will see a lot of confusing prompts to install other software,
most of which is probably ad-ware (unwanted advertising
software). Read every prompt carefully and be sure to un-check
boxes, or check them, as appropriate, so you only install the
program you want and not the other stuff. If you make a mistake,
don't worry. You can uninstall anything you installed but didn't
want. But it is an annoyance.
Unfortunately, we won't have time in this course to discuss how
to use image editing software. That topic would take another
6-week course, at least! Each program, however, has a "help"
feature and some have tutorials.
Obtaining Images
for your Web Page
You can get images from many sources, including clip art packages,
scanning, using a digital camera, creating them with graphics
software, and, of course, copying them off the web. Copying an
image off of another web page is very simple: When viewing a page in
your browser, right-click on an image (users of older Macs with
single-button mice might have to use Control-click) and select "Save
Image As..." (or "Save Picture As..." -- the actual words may be
different in different web browsers). Your browser will prompt you
to choose the name of the file and folder to save it in.
Try using the "Save Image As..." feature in your web browser by
copying the square green image from this page to your computer. Be sure to
save it in the same folder where you are keeping your assignments. This will be important later on
in this lesson when we learn to insert images into a page.
The Question of
Copyright
Before I jump into trying to explain the concept of copyright,
please be aware that I am not a lawyer and am not offering any legal advice.
If you have any legal questions at all on this topic, contact an
attorney and don't depend on anything I say here!
Because JewishGen is a U.S.-based non-profit (and its web servers
are physically located in the U.S.), it is subject to U.S. copyright
laws. Copyright is a legal concept that gives the creator of an
original work exclusive rights to it for some period of time. The
goal is to encourage the creation of new works by letting the
creators profit from them. Copyright applies to any original works
of authorship, including poetry, novels, movies, songs, computer
software, and many other things. Interestingly, even though
copyrights can expire, translations or compendiums of older works
are considered to be new works and subject to copyright. See the
U.S. Copyright Office "Frequently Asked
Questions" for more information.
For our purposes as Kehilalinks web masters, we have to be aware of
copyright laws whenever we want to use material that we did not
create ourselves. For example, pictures -- photographs, drawings,
and paintings -- whether on the web or printed, are subject to
copyright. JewishGen expects all Kehilalinks web masters to do their
best to respect copyright laws. See http://kehilalinks.jewishgen.org/documentation/Policy.htm#10
for the current JewishGen policy.
You'll note that JewishGen's policy is that it is your
responsibility to get permission for any copyrighted material. By
posting any material on your site, you are attesting that the
material either is not copyright protected, or else you have
permission. This means that JewishGen (usually) does not check the
material that you post. JewishGen has a written policy to follow in
cases where someone notifies JewishGen of a potential copyright
violation (http://kehilalinks.jewishgen.org/documentation/Policy.htm#15).
This happens from time to time.
Fair Use
Copyright law is very complicated (see for example http://www.copyright.gov/title17/), so I won't
attempt to summarize it further. Although I'm not a lawyer, however,
I know that it's frequently difficult to determine whether or not
material is under copyright, or copyrightable, or whether it
matters. Strictly speaking, one should always have explicit, written
permission to use copyrighted materials. But the strict rule isn't
always practical, or even realistic, and the decision about what
materials to use is frequently a judgement call.
Even if materials are under copyright, however, there's the doctrine
of "fair use", which permits limited use of copyrighted material without acquiring permission
from the copyright owner. The four factors used to
determine whether a particular use is "fair" are
- The purpose and character of the use, including whether such
use is of commercial nature or is for nonprofit educational
purposes
- The nature of the copyrighted work
- The amount and substantiality of the portion used in relation
to the copyrighted work as a whole
- The effect of the use upon the potential market for, or value
of, the copyrighted work
Fair use may apply
in the case of Kehilalinks pages because, among other things, we
want to use the materials for "nonprofit, educational purposes", but
you'll need to decide for yourself in each case. See http://www.copyright.gov/fls/fl102.html
for more about the fair use doctrine.
Use of Materials
from Archives and Other Sites
Many archives and web sites have policies that allow limited use of
materials that they control. Look or ask for the policy at each
archive or web site that has materials you want to use in your
Kehilalinks site. For example, for Google's policy concerning use of
materials from Google Earth and Google Maps, see this web page: http://www.google.com/permissions/geoguidelines.html.
Yad Vashem's policy can be found here:
http://www1.yadvashem.org/yv/en/about/terms_and_conditions.asp.
See this page for YIVO's policy: https://www.yivo.org/Rights-Reproductions.
One requirement all of these polices generally have in common is
"attribution" -- a credit line indicating the source of the
material.
Clipart on the Web
There are many web sites that offer free clipart or other images and
blanket permission to copy and use them. Be very careful, however, to download
only images and do not download any software when you visit
these sites. Some of these sites can be very aggressive
about installing toolbars and other add-ons that are really adware
or spyware. If a site asks you to download or install anything
other than an image file, just say "no" and look elsewhere.
If a site asks you to register, be very careful about giving up your
email address or other personal information. I generally just look
for sites that don't require any registration. Also, you might want
to have a pop-up blocker before you visit these sites because some
are not shy about popping ads up over and over again.
Search for "free clip art" on Google, and practice copying
images. As you will see, there is a cornucopia of free icons,
buttons, horizontal lines, and other images that are available on
the web. But be careful what sites you visit and what you do on
those sites.
Security
This is a good time to remind you that, before you ever surf the web,
be sure you have a good antivirus program and all the latest
security patches installed! Even Mac users need to take
heed of this, because the number of Mac viruses is increasing
rapidly. You might want to take a look at the US Computer Emergency
Readiness Team (US-CERT) web site (https://www.us-cert.gov/cas/tips/)
that has additional tips for non-technical computer users about how
to keep your computer secure.
Making Images the
"Right Size"
I said earlier that it is important to keep the size of images
relatively small so that your pages load quickly, so I want to give
you a few guidelines for sizing images that you will use in your
pages, no matter what image editing programs you use.
Width in Pixels
If you have images that are more than the width of a browser window,
the person looking at the page either has to increase the size of
the window or scroll to see the entire picture. If the image is
larger than that person's screen then all they can do is scroll. And
don't forget that large pictures will be a lot slower to download.
(A new consideration for web designers is that many people are now
surfing the web on their smart phones, which have small screens, but
that's probably not an issue for our Kehilalinks pages.) Consider
that a 5 megapixel camera takes pictures of size 2500x1700 or so,
which is a larger resolution than most people's screens can show
without scrolling, and the size of the resulting jpg file can be
over 2 million bytes, and you can see why it is important to reduce
the size of the pictures that you put on your web site.
Many programs let you adjust the size of an image in inches or
centimeters and the resolution of the image, expressed as "so many
pixels per inch (or centimeter)". You can calculate the total
number of pixels with some simple math: multiply the number of
pixels per inch (or centimeter) by the width in inches
(centimeters). For example, if your software says an image is 100
pixels per inch and 5 inches wide, you know that the image will be
500 pixels wide when displayed in your page. Similarly, if you scan
a 5-inch wide postcard and use a resolution of 100 pixels per inch,
the resulting image will be 500 pixels wide. It doesn't matter
whether you adjust the resolution or size of the picture to reduce
the number of pixels because web browsers generally just care about
the number of pixels.
Quality or Number
of Colors
In addition to reducing the number of pixels in an image, you can
reduce the size of the image file itself by increasing the
compression of the image. In gif and png files, you can reduce the
number of colors from 256 to a lower number. In jpg files you can
reduce the "quality" of the image. Your software may offer you
"low", "medium", and "high" as choices for jpg files, or numbers
ranging from 1 to 100, or even the choice of a percentage. The best
trade-off in jpg images for the web between size and quality occurs
at the "medium", or "70", or "70%" quality level. Higher qualities
can greatly increase the size of the image file without looking
noticeably better on the screen. When preparing your images for your
web site, use image editing software and experiment with different
quality settings to see what works best.
Inserting Images
Into a Web Page
Before we learn to insert an image into a web page, first open a new
Composer window.
Before we do anything else, save the new page in the same
folder where you already saved the green box.gif file. It
is important for this lesson that the image files and the HTML files
are in the same folder. Technically speaking, this is not a
requirement for a web page, but if you have the image and HTML files
in the same folder it will make things easier for me to explain and
easier for you to follow my explanation.
To insert an image into your page in Composer, click in your
Composer window where you want to insert the image, then either
click on the "Image" icon  in the second
tool bar line or select
in the second
tool bar line or select 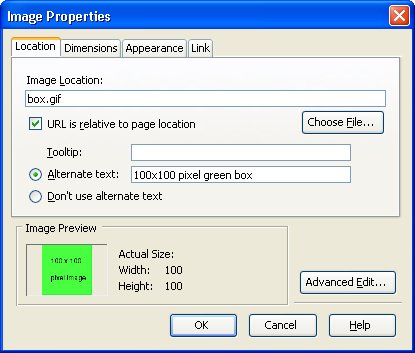
Insert ->
Image...
Composer will present you with a new window, called "Image
Properties." The first "property" that you want to choose is
the image file to insert. Click on "Choose File..." to tell
Composer the name of the file and the name of the folder it is in.
Find the "box.gif" file that you downloaded earlier. It should be in
the same folder where you just saved the Composer page that you are
currently working on. If you saved them both in the same folder,
after you choose the file your Image Properties window should look
like the one shown here, with the name of the file, "box.gif", in
the Image Location and the box checked next to "URL is relative to
page location". If there is anything else in the Image Location then
you probably did not save the image file and the HTML file in the
same folder, so try saving the image and the HTML files again.
Note that I have typed some words where it says "Alternate text".
Alternate text is what is displayed when, for some reason, the image
file itself can't be loaded, and sometimes when you let your mouse
hover over an image in a web browser (depends on the browser and on
the browser settings). You have the option of not supplying any
alternate text, of course, but it is a good idea to always do it.
Once you have correctly chosen the image file and typed in some
alternate text, click "OK" to insert the image into your web page.
Be sure to browse the page to make sure the page looks the same in
the browser as it does in Composer.
Copying and
Pasting Images
You might be tempted to simply copy and paste an image from
another web page or document into your Composer page. Don't do it.
Sometimes Composer will simply insert a link to the image on the
other site (what happens to your page when that site changes and
the image is no longer available?), or Composer may copy and place
the image in a temporary location that a browser can't access
(different versions of Composer have done different things).
Either right-click and save an image as a file on your computer or
copy and paste it into an image editing program, then save the
image as a file on your computer and insert it the way described
above.
Changing Image
Properties
Once you clicked "OK" to insert the image, the Image Properties
windows disappeared. 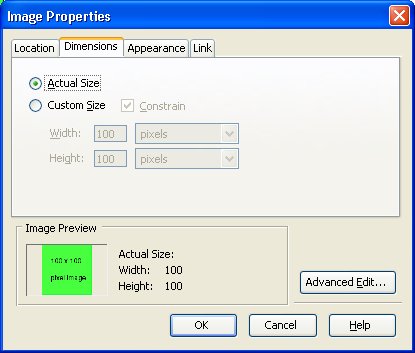 To get it back, double-click
on the image in Composer. You can also get to image properties by
clicking once on the image to select it and then selecting
To get it back, double-click
on the image in Composer. You can also get to image properties by
clicking once on the image to select it and then selecting
Format -> Image Properties
You can also
click on the image and then click on the Image icon on the
toolbar, and that will open the Image Properties window.
Now we'll learn about the two tabs "Dimensions" and
"Appearance" in the Image Properties window. The "Link" tab will
have to wait until we learn about HTML links in a later lesson.
Dimensions Tab
Click on the "Dimensions" tab in the Image Properties window.
Your Image Properties window should look like the one here. The
image is "actual size" -- 100 pixels by 100 pixels. You can also
change the size of the image by clicking in the circle next to
"Custom Size" and choosing a new width and height. Here, for
example, is the exact same green box image file, but with the custom
size set to 20 x 20 pixels: This doesn't change
the size of the image file itself, just the size as displayed in
the web page. So, if this was a really large image file, even
though I set the displayed custom size to be very small, it would
take just as long to load and take up just as much memory as if it
were displayed at its actual size.
If you keep "Constrain"
checked, you can only choose a combination of width and height that
have the same proportions. Because the original image is square, you
can only choose dimensions where the width and height are the same.
If you uncheck "Constrain", however, you can change the proportions
of the image, like here, where the image is 200 x 70: Again,
this doesn't change the original image, just the way it is
displayed. Be aware, however, that changing the proportions of an
image will also distort it. For example, the text in the green box
is much flatter in the 200 x 70 version than in the actual size of
100 x 100.
You have a choice of making the size of an image "absolute" -- a
fixed a number of pixels -- or "relative" to the size of the browser
window. Try this out on the green box image by choosing a custom
size width of 100 and a height of 100, but make sure to uncheck the
"Constrain" box and select "% of window" instead of "pixels" for the
width. You should get something like this:
What happens when you adjust the size of
the window? The image should always occupy the full width -- 100% --
of the window no matter how narrow or wide you make it. Similarly,
you can make the image 50% of the window size and it will always
occupy exactly half of the width of the window.
I recommend that you (whenever possible) use the actual size of an
image. The reason for this is that not all browsers treat the
modified size in the same way. If you make the image smaller,
for example, I have seen some browsers, instead of shrinking the
image, simply truncate it, cutting off the "excess" to make the
image fit the smaller space! When you make an image larger, on
the other hand, the browser has to increase the size of the pixels,
so that you end up with a picture that contains large squares and
looks blurry. In most cases when you need to modify the size of an image,
you are better off doing it with graphics software rather than
using the size property in a web page.
Appearance Tab
Now open the Image Properties window for the box image and
select the "Appearance" tab. There are two key features here. First
of all, there are the parameters for "spacing". The "Left and Right"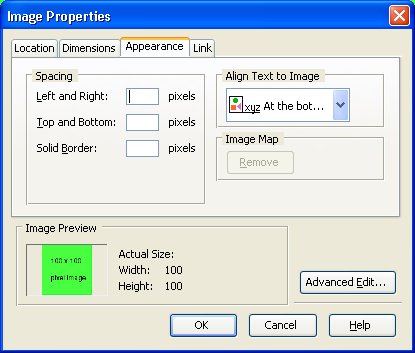 and "Top and Bottom" boxes refer to the
amount of empty space (in pixels) to leave around the image. This
feature is useful when you have text wrap around the image, to put
some blank space between the text and the image. (We'll learn about
wrapping text around an image soon.) The "Solid Border" allows you
to add a solid border around an image, like the 5-pixel border shown
around the green box here.
and "Top and Bottom" boxes refer to the
amount of empty space (in pixels) to leave around the image. This
feature is useful when you have text wrap around the image, to put
some blank space between the text and the image. (We'll learn about
wrapping text around an image soon.) The "Solid Border" allows you
to add a solid border around an image, like the 5-pixel border shown
around the green box here.
You can change the color of the
border around the image by selecting the image (i.e., click on it
once in Composer to highlight it) and then
"Format -> Text Color".
(That's strange, I know, that the border around an image is treated
as text.)
Try making borders of different colors and thicknesses around the
green box in your practice page.
Composer offers a variety of options when it comes to text alignment
relative to an image. Some of the options treat the image as
if it was in-line with the text, allowing you to choose where the
text aligns with the image. Two other options anchor the image to
either the left or right side of the web page and allow the text to
flow around the image. For example, the "Image Properties" window in
this section uses the "Wrap to the left" alignment, which puts the
image on the right side of the page and allows the text to flow
around the left side of the image. The green boxes in this section
that have 5-pixel borders, on the other hand, uses the "Wrap to the
right" alignment.
Type a paragraph of text in your practice page (the one you already
have open that has the green box in it), then try inserting the
green box in the middle of the text someplace and try out different
alignments to see how they work. You can also "drag and drop" the
image, to move it around in the page. Try that out, especially with
the "Wrap to the left" and "Wrap to the right" alignments, to see
what happens. Try inserting two green boxes and moving them around
relative to each other. Also, don't forget to browse the page to see
how things look in different browsers and resize the browser windows
to see how the window size affects the placement of the images on
the page.
Note that not
all of the "alignment" options are supported by all browsers
(and even the ones that are supported are not guaranteed to work
exactly the same), but the two "wrapping" options generally work
the same in all browsers.
Centering Images
You can center an image by putting it in its own paragraph (i.e.,
using the "paragraph" format, or just separated from text by a line
break on top and bottom), clicking on the image to select it, and
then centering it by using the horizontal alignment tool.
Placing Images
Side-by-side
It isn't
possible to reliably put images side-by-side using the tools that
we've learned about up to now, so don't frustrate yourself
by trying. You'll add all sorts of spaces and line returns that
might look OK until you view the page in a different size window,
and that will mess up the layout of the text. We will, however, in a
future lesson, learn a technique for laying out pictures in a
controllable way -- above, below, side-by-side -- that will persist
even when browser windows are different sizes. Please be patient,
neither Rome nor our web pages can be built in a day!
Horizontal Lines
Horizontal lines help to break up a web page, visually separating
different sections. You can draw lines using an HTML feature or use
an image. You will find many line images on the clip-art sites, or
you can even use a single-pixel image and change the dimensions of
the image to create a line. This is a line image that I copied off
the web:

Single-pixel
Lines
Although in general I say that you should always use the
original size of an image, there are some cases when using
different height and width dimensions can help speed the
downloading of your page. For example, you can use a
one-pixel image, which downloads extremely fast, but specify a
height of 3 pixels and a width of 100% of the window for the
image dimensions, to create a color bar in your web page. You
can use an image editing program, like Irfanview or Gimp, to
create lines or single-pixel images in whatever colors you want.
Here's a single-pixel red gif file (that I made using Irfanview)
displayed as a 500x3-pixel line:

Right-click the red line and
download the "redpixel.gif" file using "save image as". It
can be a bit tricky to right-click on the line because it is
only 3 pixels tall. Use the redpixel.gif file to make your
own color line.
Be
careful to specify the dimensions of the line right at the
time when you insert the single-pixel image. If you
forget, it could be very, very hard to find and edit the
misplaced, tiny pixel image! Can you see the red
pixel just after this sentence? -->
<-- How easy is it for you to
right-click on it?
HTML Lines
HTML has a feature that will draw horizontal lines that do not
require a separate image file. Think of them as a relatively
"cheap" (in the sense that they don't cost much in the way of
download time and computer memory) type of image. They are a
relatively simple web page feature, so you can also think of this
part of the lesson as relatively cheap (also in terms of time and
memory -- your own).
The exact appearance of HTML horizontal lines will vary by
browser. Character-based browsers will display them as a
line of dashes or underscores, while graphical browsers will show
them as either solid or shaded lines. They are always gray or
black. Composer gives you some simple controls over how they
will look.
100%
window width, 2 pixel height, centered, 3D shading
50%
window width, 5 pixels height, centered, no 3D shading
To insert an horizontal line into your document, select
Insert -> Horizontal Line
This will draw a simple line using default settings, wherever the
blinking cursor is. Composer will put line breaks immediately
before and after the line. To set a horizontal line farther apart
from text, insert extra line breaks before and after the line.
Selecting HTML
Lines
HTML lines are usually quite thin and difficult to select, but you
need to be able to select them so you can delete them or change
their properties. An easy way to select a horizontal line is to
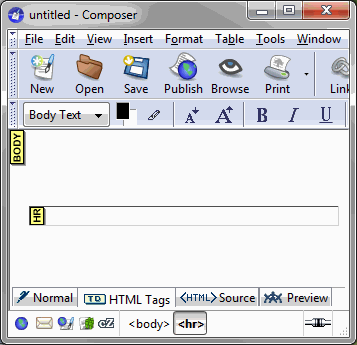
click on the "HTML Tags" tab at the bottom of the Composer window.
You will see a yellow "HR" next to the suddenly wider horizontal
line. Click on the line (or the yellow "HR") to select the line.
You can then press the "delete" key or the "backspace" key on your
keyboard to delete the line, or double-click on the line to access
the Horizontal Line Properties window.
(Hint: This technique also works for the single red pixel you had
trouble right-clicking on earlier!)
Formatting HTML
Lines
To format a horizontal line, double-click on it, which will open a
small window called "Horizontal Line Properties."
The properties of a horizontal line that you can choose are the
height and width, alignment, and 3-D shading. No colors are
possible in HTML lines. To make a color horizontal line you will
have to use an image, as described above.
Once you have set the properties of a horizontal line, you have
the option of making your settings the default, so that subsequent
horizontal lines that you insert will automatically look the same.
Height and Width
The height and width properties are similar to those you used for
images. You can set the width in pixels or percent of the wind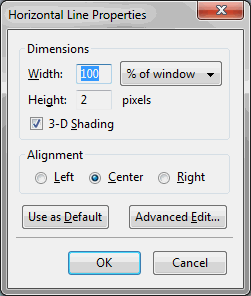 ow. Height you can only set in pixels.
Alignment
The three choices of alignment are left, center, and right.
The effect of these choices is identical to the effect of using the
paragraph alignment tool.
3-D Shading
The default graphical display of HTML horizontal lines in most
browsers is usually with some kind of shading to give the line a
chiseled or embossed look. Unchecking this setting may have
different results when the line is viewed in different browsers. In
some browsers it may be displayed as a solid, black line, while in
others it may look more like a box, with a black outline but nothing
in the center. Try this out with your various browsers.
Assignment
Your
assignment this time is to add images to your page. At a minimum,
add the Kehilalinks logo, which Kehilalinks policy requires on every
page. You can get it from any Kehilalinks page on the Kehilalinks
site. Download that image file to your computer (into the same
folder as your web page) before you insert it.
Also add a horizontal line, either an HTML line or a color line.
If you have pictures from your Kehila, add those, too. But make sure
they aren't too large!
I've added the Kehilalinks logo, a horizontal line image, and a
picture of Kamen Kashirskiy to my web page: kc-3.html.
I put the Kehilalinks logo in the rectangle in the top left of the
page. To insert the image (or text, or anything) into the empty
rectangle, in Composer
first click in the box so that the blinking cursor is there, then
insert the image.
Note that I used
an image for the horizontal line. I tried using a HTML horizontal
line, but there appears to be a bug in Composer when using an HTML
line in some cases, and I had trouble inserting text after the
HTML line,
so I went with the image line instead.
Copyright © 2009, 2010, 2012, 2013, 2014, 2016 Mark
Heckman. All rights reserved.