How to
Make Kehilalinks Pages
Uploading Your Website to
Kehilalinks
Introduction
By this time in the class, if you've completed the assignments for
each lesson, you should have a simple Kehilalinks web site that has
text, links and even some images -- ready to upload.
To "upload" your website means to transfer your web page file(s)
from your computer to a web server. In this lesson you will learn
how to use an FTP client program to upload your files to the
Kehilalinks web server. FTP stands for "File Transfer Protocol".
HTTP is specifically aimed at transferring web pages, but FTP was
developed to transfer files in general. Kehilalinks has an FTP
server running on the same system as the web server to allow
Kehilalinks web masters to upload their files.
Hopefully, by now you've received your FTP Username and password
from Kehilalinks. If not, and assuming that you've turned in the
donor form, contact the Kehilalinks coordinator in case your form
was misplaced. If you don't have your FTP Username and password then
you won't be able to complete this lesson. That isn't a fatal
problem in terms of the class, however, because you can always come
back to this lesson as soon as you do and, meanwhile, you can
continue with the other lessons. But if you don't have your
Kehilalinks FTP Username and password by now, it is important that
you follow up and get them before the class is over!
Installing FireFTP
As part of this lesson, you will need to install an FTP client
program on your computer. In this class, we will use the FireFTP
addon for SeaMonkey. FireFTP is an FTP client that works in the
SeaMonkey browser, so you don't have to open a separate program, and
it works the same on both PCs and Macs. And it is free (although, as
with much free software, the developers would appreciate a
donation).
We are going to download and install FireFTP in the SeaMonkey
browser. To install FireFTP, open the SeaMonkey
browser (this won't work if you are not using the
SeaMonkey browser) and go to https://addons.mozilla.org/en-US/firefox/addon/fireftp/.
Ignore the message that
says it needs Firefox and click on "download anyway".
This will open a window that says "Install add-ons only from authors
whom you trust." Click on the "Install" button at the bottom of that
window to install FireFTP. Then you will be prompted to restart
SeaMonkey to complete the installation.
Other FTP Clients
FTP clients all support pretty much the same FTP features, so
whatever FTP client you use, on whatever operating system, they
all can do what I'm going to show you, even if they have a
different user interface. If you use any FTP client program other
than FireFTP, however, I won't be able to help you if you run into
problems because I won't be able to see the interface.
If you already have an FTP client and are comfortable using it,
feel free to use it for the class. If you don't already have an
FTP client, but you don't like FireFTP for some reason, or you
just can't get it to work, here is another FTP program that runs
on both Windows and Mac systems: Cyberduck. Remember, however,
that I'm only providing help for FireFTP!
Using FireFTP
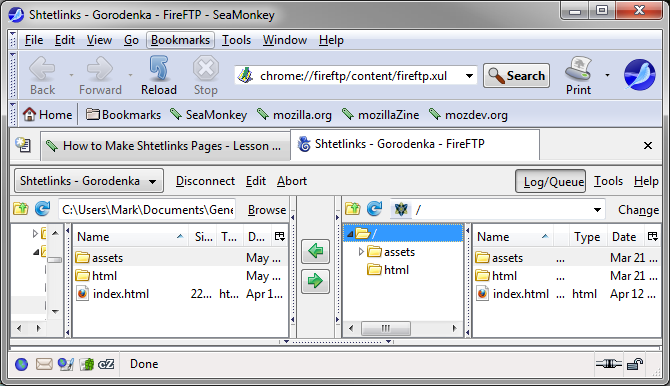
To start FireFTP, in your SeaMonkey browser, click on "Tools ->
FireFTP". That will open another tab in the browser that contains
the FireFTP interface. The window will look something like this:
On the left, beneath where it says "Create an account", that's the
panel that represents your computer. Click on the folders on the
left and navigate to the folder that contains your web pages, so the
files are showing in the window.
The panel on the right represents the FTP server that you connect
to. You haven't connected to one yet, so that panel is blank.
Entering your FTP
Account Details
Before you can connect, you need to tell FireFTP your FTP account
details, which you should have already received from JewishGen. This
will include the name of the server ("kehilalinks.jewishgen.org" --
don't use
"http://"!), your FTP Username, and password. Note that the Kehilalinks FTP
Username and password are different from your regular JewishGen
Username and password. You must have already
completed the reservation process to have a correct Kehilalinks FTP
Username and password.
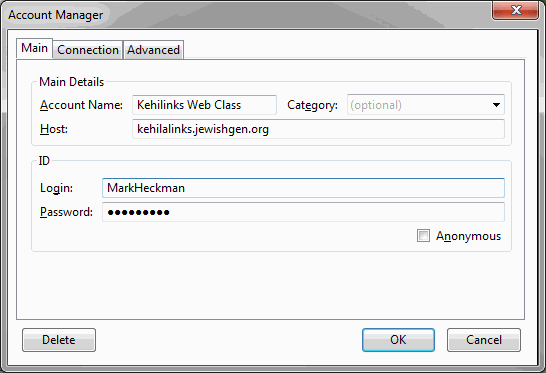
To start, click on where the FireFTP interface says "Create an
account...". This will open the Account Manager window. In the
"Main" tab, enter your FTP account information that you received
from JewishGen, as shown in the next figure: the "Host"
(kehilalinks.jewishgen.org), "Login" (i.e., the Username), and
"Password" (remember to use your FTP Username, not mine as shown in the
picture). You can also specify an Account Name, so, in case you have
multiple FTP accounts, you can tell them apart.
You don't need to change anything on the other tabs; the defaults
there are correct. Click OK when you are done.
Connecting to the
Kehilalinks FTP Server
After creating the account, you can connect to the Kehilalinks FTP
server by clicking on "Connect" , next to where you clicked on
"Create an account...". If you've entered the correct host, login
username, and password (and if your computer is connected to the
Internet), you should be able to connect to the Kehilalinks FTP
server. You will know you are connected when the right panel is no
longer completely empty and the "Connect" button has changed to
"Disconnect". If you get an error message, check the account
information that you entered in the previous step. To view and
change the account information, if necessary, click on the "Edit"
button next to the "Connect" button. That will re-open the "Account
Manager" window without having to create another account.
Before you go any further, you should at this point refer to the
FTP instructions that were sent to you by Kehilalinks!
After you connect to the server, the contents of the right panel
will change:
If you are managing just one
Kehilalinks site, the folder that you see in the right
panel is your root folder on the Kehilalinks server . You can tell
it is the root because its name is just "/". This is where the
"index.html" file goes, along with all of the other files that make
up your web site. You must put your index.html file in the root folder or
else the web server will not be able to find it! Don't make
the mistake of putting your index.html file in a subfolder of the
root folder.
If you are managing multiple sites,
you will be given an FTP account that gives you access to all
Kehilalinks folders (you can only modify the folders for your sites,
but you can see all of the others). In this case, in the right panel
you will see many Kehilalinks folders. Navigate to your folders by
scrolling down the window until you find one of your folders then
double-clicking the folder. That opens the root folder of one of
your sites. The Kehilalinks FTP instructions that were sent to you
will have more information about this.
Copying Files to
the Server
Remember, the files on the left are on your computer and the files
on the right are on the Kehilalinks server. Don't get them confused
or you might clobber newer versions of the files on your computer by
copying old versions off the server. To copy from your computer to
the server, first click on a  file that you want to copy, which will highlight it,
and then click on the green arrow that points to the right. You can
also copy folders.
file that you want to copy, which will highlight it,
and then click on the green arrow that points to the right. You can
also copy folders.
After you copy your files to the server, the FireFTP interface
should look something like this (your files and folders will be
different from mine, of course):
Do you see the "index.html"
file showing in the root folder? As I said in the
preceding section, you must put your index.html file in the root folder or
else the web server will not be able to find it. You can
arrange your other files any way you want, but the index.html file
must be in the root folder. A common error is to copy the entire
folder on your computer where your page is. You don't want to do
that. Instead, copy the contents
of that folder -- the files and subfolders -- to the server.
Reminder About
File Names
I mentioned earlier in the class that the file names you use for
your web pages should have only letters or numbers, plus the dot
('.'). You can also use the dash ('-') or underscore ('_')
characters in file names, and those will generally work in any
browser on any web server. It is not good to use any other characters, such as
punctuation, spaces,
or accented characters. They may prevent people from being
able to view your pages. Also, older Internet protocols, like FTP,
may not work with them, which could make it difficult for you to
upload your pages. To be safe, I generally stick to letters,
numbers, dashes, underscores, and dots in files names on my web
sites. This goes for ".html" files, but also for ".pdf" and other
types of files as well.
Other File Tools in
the FTP Client
If you right-click (Mac single-button control-click) on a file name
in the FireFTP client, you will find other file management tools,
such as "delete", "rename", etc. You can use these tools to manage
the files on the server after you upload them. Use the FireFTP
"help" feature if you have more questions about these tools.
Disconnecting and
Reconnecting
When you are done uploading files to the server, click on where
it says "Disconnect". That will close your connection to the
Kehilalinks server. To reopen the connection, click on "Connect"
again.
Updating Your Site
After you have uploaded your files to the server, you will no
doubt later (or even immediately) want to make changes to your
site. How do you modify the pages that you already uploaded to the
server? You can't directly modify the files that are on the
server, but you can edit each page on your own computer and make a
new version, then upload the new version to the server. FireFTP
will ask you if you want to "overwrite" the existing file. When
you click on the "Overwrite" button, FireFTP will automatically
delete the old version of the file on the server and copy the new
one. If there is a file on the server that you want to delete, but
there is no new version of that file to upload (because, for
example, you changed the file name), right-click on the file in
the right panel (where the files that are on the server are
showing) and select "Delete", which will remove the file from the
server.
Browse your Page
on Kehilalinks
Once you have uploaded your web page to Kehilalinks, it is viewable
by anyone using a web browser who knows the URL. Point your browser
to "http://kehilalinks.jewishgen.org/YOUR_KEHILA/", but replace
"YOUR_KEHILA" with the name of your site that was assigned by
Kehilalinks. Kehilalinks would have told you that name when you
received your FTP login information. For example, to view my Kamen
Kashirskiy site I would use the URL
"http://www.kehilalinks.jewishgen.org/Kamen-Kashirskiy/". (Note how
Kehilalinks gave my site the name of the town with a dash between
the two words. I didn't choose that name; Kehilalinks assigned it to
me.) Be sure to
use the kehila name that was assigned by Kehilalinks, or
the URL won't work.
If your browser
gives you an error message saying that the page is "not found" or
"you don't have permission", and you are sure you are using the
right URL, make sure that you called your home page "index.html"
(or "index.htm") and that the index.html file is in your root
folder on the server. Once you are able to view your site,
bookmark the URL so it will be easy for you to go back to it.
If you are still having problems viewing your site, let me know with
a post to the discussion forum and I will take a look. A nice thing
about uploading your pages to the server at this point is that I can
directly view your work, which will make answering questions quite a
bit easier.
Change the URL of
the Kehilalinks Logo
We have to make a slight change to the URL for the Kehilalinks logo
image before we will meet Kehilalinks guidelines. Kehilalinks wants
everyone to use the same image file for their logo so that
Kehilalinks will be able to change their logo on all of the
Kehilalinks pages at one time (whenever they decide to change their
logo).
Read these instructions carefully, because
some people find this step tricky!
- First, edit your page in Composer and delete the existing
Kehilalinks logo image from the page. It will just confuse
things if you leave it there. Once there is no longer a logo
image in the page, continue with the following steps:
- In Composer, click in the page where you want the logo to be,
so the blinking cursor is there.
- Click on the "Image" button to open the "Image Properties"
window.
- In the "Image Properties" window, where it says "Image
Location:", type "/images/KehilaLinksLogo.transparent.png"
(without the quotes).
- Make sure the "URL is relative to page location" box is
checked.
- Click "OK".
- Save and upload the page.
The logo you
just inserted will not be visible when you view the copy of the
page saved on your computer (because it uses a relative URL
that only works on the Kehilalinks server), but it will be visible
when you view the page after you upload it to the server.
Thoroughly Test
your Page After Uploading
When you've uploaded your site and can access it, see how it looks.
Check all the links, see if
you've forgotten some image files, etc. You should completely test
your pages before you upload them, of course, but sometimes things
are different when the pages are on the web server compared to when
they are on your home computer, so you should thoroughly re-check
your site after uploading.
A common problem
occurs when you accidentally use absolute URLs, not relative URLs,
for images (and for links to local pages). So, for example, if an
image doesn't appear in your page on the server, but it does on
your computer, and even though you know that you uploaded the
image file to the server, use Composer to check the image
location. More likely than not, you forgot to check the "URL is
relative to page location" box.
Assignment
Your assignment this lesson is to first change the URL of the
Kehilalinks logo as described above and then to upload your web
pages, in whatever state they are. Please don't worry that they are
not "finished" -- no web site is ever finished, especially a
genealogical web site -- and you don't have to go live with them yet
so no one outside of the class will see them, but at least upload
them so you practice uploading.
Once you have uploaded your pages, please announce it in the class
forum so we can all take a look at what you have done so far. It's
good at this point to get some feedback on your work.
Copyright © 2009, 2010, 2012, 2013, 2014, 2016 Mark
Heckman. All rights reserved.