How to
Make Kehilalinks Pages
Introduction to Tables
Introduction
Many KehilaLinks pages are organized in a simple "top-to-bottom"
fashion, but most web pages that you see are organized as tables,
with rows and columns. HTML supports a table feature that is one of
the most common ways in web pages to control the layout of text and
images. A table can contain text, images, horizontal lines,
and even other tables. Because tables are such a powerful
feature, they can also be quite complicated. In this lesson we
will learn the basics of creating and using tables. In the
next lesson we will learn how to use tables to make our web pages
look more like those that are made by professional web page
designers.
Rows, Columns, and
Cells
A table is a compact way
of presenting related information. The information in a table is
organized into horizontal rows and vertical columns.
At the top of each column is a column heading. The
intersection of a row and a column is called a cell.
| For example |
this is |
a table |
| that has |
four rows |
and
|
| three columns, |
for
|
a |
total
|
of |
twelve cells. |
Table 1. Example of a table
Use the Normal Tab
Use the "Normal" tab on the "Edit Mode" toolbar at the bottom of
the Composer page (use View -> Show/Hide -> Edit Mode
Toolbar if you can't see it) when editing a page that
contains tables. Even tables with borders that are invisible in
the "Preview" view, will still be visible in the Normal view.

Inserting and
Deleting Tables
 You
insert a table into a web page by selecting
You
insert a table into a web page by selecting
Table
-> Insert -> Table
Composer will then present you with a window called "Insert Table" .
This window has the following options:
-
Number of rows
- The rows are the horizontal lines of cells in the table.
-
Number of columns
- The columns are the vertical lines of cells in the table.
-
Table width
- The value in this box sets the width of the table, either in
terms of pixels or as a percentage of the width of the browser
window -- like you can do with images. Note that if you
put something -- text, an image, another table -- into a table
that is too small to hold the item, the web browser will
(usually, but it depends on the browser) automatically resize
the table to hold the large item and override this setting.
-
Border line width
- The border is the "frame" around the table. For example, the
example table ("Table 1") above has a border of 10 pixels. If
the Border box is empty or has the number 0 in it, the table
will be borderless and there won't be any lines separating the
cells. If the border is at least 1 pixel then there will
be lines between the cells. The exact look of the border depends
on the browser that you are using. SeaMonkey displays the
border using an "embossed" look; other browsers may just display
it as a grey line. Increasing the border line width will
increase the width of the outside border line only, not the
width of the space between cells (see "Cell spacing," below, for
how to increase the border line width between cells).
Open a new Composer page and insert a table that has 3 rows and 3
columns. Try out different border widths to see how it looks. View
the page in SeaMonkey and in another browser to see if there is any
difference in how the border is displayed.
Now delete the table in Composer by clicking anyplace in the table,
right-clicking, and selecting
Table Delete -> Table
That will delete the entire table. You can also delete just a row or
a column (first click in any cell in the row or column that you want
to delete), a specific cell (but what happens when you delete just
one cell; do you see the other cells shift?), or the contents of a
cell (i.e., clear the cell).
Entering and
Editing Text and Images in Tables
Create another 3x3 (3 rows by 3 columns) table. 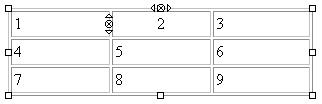 To
type
text in a cell, first click in the cell so you see the cursor there,
then start typing. Enter the numbers from 1 to 9 in the 9 cells.
What happens as you do this? When you type the first number, does
the column get wider? What happens after you've typed in all three
columns? Browse the page after typing each number.
To
type
text in a cell, first click in the cell so you see the cursor there,
then start typing. Enter the numbers from 1 to 9 in the 9 cells.
What happens as you do this? When you type the first number, does
the column get wider? What happens after you've typed in all three
columns? Browse the page after typing each number.
After you enter all the numbers, click in the cell with the "2" and
click the center alignment tool button. See how the text centers
within the cell? In general, you can use any of the text tools, like
alignment, lists, fonts, font sizes, colors, etc., and insert
images, inside tables. Each cell becomes a kind of "mini web page"
where the formatting is almost independent of what is in the other
cells.
I say "almost" independent because the cell sizes are not
independent. To see what I mean, after the "2" type the ENTER key.
See how the height of the cell automatically adjusts to fit the
text? What happened to the other cells in the same row? Their height
adjusted the same way. Every cell in a row must have the same
height. Similarly, every cell in a column must have the same width.
Now insert the green square image that we used in a previous lesson
into one of the cells. What happened? You should see the size of the
cell that contains the image enlarge to fit the image. The other
cells in the same column and row must also change size to match the
cell with the image. Try inserting the Kehilalinks logo into another
cell so that you have one cell with the green box and one with the
Kehilalinks logo. Do this in different rows and columns so that the
images are sometimes in the same row, same column, or in entirely
different rows and columns. What happens to the cells? Remember to
browse your table in different browsers to see if there is any
difference in how the table is displayed.
|
1
|
2
|
3
|
|
4
|
5
|
6
|
|
7
|
8
|
9
|
Inserting Tables
in Tables
It is easy to insert a table into another table cell: just click in
a cell of the outer table and select Table -> Insert Table.
When you set the size of the inner table, you'll see that it is in
terms of either pixels or percent of the containing cell (e.g.,
"100% of cell"). On the other hand, if you increase the size of the
inner table to a fixed number of pixels, the containing cell will
expand to fit the table it contains.
Always Keep Some
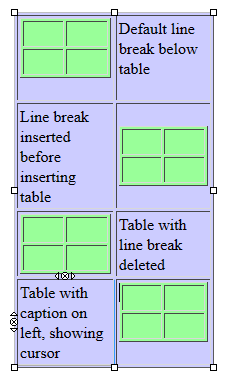
Text in Table Cells When you Insert Tables
By default, Composer puts a soft line break (equivalent to
holding the Shift key down while you
press the Enter
key, as discussed in Lesson 3) into each cell when you insert a
table into the cell. So when you insert a table into a cell, the
inner table will not automatically occupy the entire cell, but
will have a line break that will occupy part of the cell.
Composer doesn't make it easy to navigate between the inner table
and the cell that contains it if there is not also some text or an
image in the cell that contains the inner table. If you were to
delete the line break, Composer would only allow you to select the
inner table. You couldn't select the cell that contains the table
to insert any text, or change the color of that cell, or to change
any properties of that cell at all. So that line break (or some
other text or an image) must always be there if you want to be
able to access the cell.
If you find it annoying that you can't get the inner table to
occupy the entire cell, at least you can make the position
symmetrical by inserting a line break before you insert the table.
Then there will be equal space top and bottom of the inner table.
Or you can go ahead and delete the line break, so the table
occupies the full cell, and use a table caption on the inner
table to keep the cell accessible, which is something I'll talk
about later on in this lesson.
Adding or Deleting
Rows and Columns
What if you insert a table but later find that you need more rows
and columns, or find that you made too many and want to delete some?
You can do this in several ways. First, when you click in a cell did
you notice the little arrows and circles with "x" in them that
appear on the left side and top of the cell? If you click on a
circle with an "x", that will delete the row or column that the cell
is in. If you click on an arrow, that will add a row or column on
the side of the cell where the arrow points.
You can also simply right-click in a cell and select "Table Insert"
to insert a row, column, cell, or even another table, or right-click
and select "Table Delete" to delete a row, column, cell, or the
entire table.
Or, with the blinking cursor in the table, use one of the tools
under the Table menu (e.g., Table -> Insert -> Row Above).
Table Properties
Right-click (on single-button Macs, control-click) anyplace in the
table and select "Table Cell Properties". In the "Table Properties"
window that opens,  click on the "Table" tab. You will see some of the same
options that you saw in the "Insert Table" window -- rows, columns,
border, etc. -- but also some additional table properties. I'll
explain the Table Properties here (we'll talk about Cell Properties
later):
click on the "Table" tab. You will see some of the same
options that you saw in the "Insert Table" window -- rows, columns,
border, etc. -- but also some additional table properties. I'll
explain the Table Properties here (we'll talk about Cell Properties
later):
-
Spacing
- The cell spacing feature controls the space between cells
within the table. This spacing is always in terms of
pixels. The cell spacing is unaffected by the width of the
border line, but a line between cells (i.e., around the empty
space between cells) will only appear if the border is
greater than 0. If you set the spacing to 0 and set the
border to 0, it will appear that the cells are touching each
other with no line or empty space separating them. If you set
the border to 0, and the cell spacing to anything other than 0,
there will be empty space between the cells and no line.
-
Padding
- Cell padding is the amount of empty space within each cell
between the cell's contents and the cell border. For
example, if you are using a border line in a table, you might
want text in the cell to start a few pixels away from the border
line, so that it is easier to read.
-
Height
- As with the table width, a browser will automatically adjust
the height of the table, depending on the table contents and on
width of the browser window. If you check this box,
however, you are fixing the minimum table height in pixels or as
a percentage of the window height (or of the parent cell, if you
are inserting a table into a table).
-
Table Alignment
- This setting is equivalent to using the alignment tools on
text. You can center the table in the browser window, align it
on the left side of the window, or align it on the right
side..What you can't do is have the stuff outside the table wrap
around it, like you can do with images. (That's a serious
limitation of Composer and is due to HTML standards having
changed and Composer not having been updated to deal with the
changes.) But
there is a problem with the Table Alignment setting on older
versions of Windows Internet Explorer: Older versions of Windows
Internet Explorer (pre-11) ignore it! Even if you
center the table (or align it to the right) using the table
alignment property, and it looks centered (or right-aligned)
in SeaMonkey, Internet Explorer puts the table on the left.
There is a kludge we can use to center a table (or right-align
it) in Internet Explorer, however, that I'll explain later.
And, just to reiterate, this is another reason why it is so
important to view your page using different browsers!
-
Caption
- You can put a text caption above, below, left, or right of a
table. I'll talk about captions later on in this lesson.
-
Background Color
- You can set a background color for all cells in a table, just
like you can choose a background color for a page.The background
color for the table will cover the background color for the
page, so you can make your tables stand out from the rest of the
page. Notice how the space between the cells also uses the table
background color? If you set a background color and later want
to remove it entirely and let the page background color show
through, select the "default" color (i.e., the "Default" button
in the "Table background color" window that opens when you
select a color. Be sure to always use this box in the table properties
window to change the table background
color. Always right-click
and
select "Table Cell Properties...". Don't right-click and
select "Table or cell background color", which only seems to work
on the current cell.
This table
|
has a different
|
background
color
|
than the
page.
|
Try out each of these properties. Click on the "Apply" button each
time you make a change to see how the table looks in Composer.
You can modify the table properties and re-apply until the table
looks the way that you want it to. At that point, click on the
"OK" button to close the "Table Properties" window. Be sure to see how each of
these properties work in other browsers, too.
Using Table
Background Color Like a Block Color
In the last lesson I
mentioned how block colors can sometimes be tricky to use
and that I was going to show you how you could do the same
kind of thing -- adding color to just a section of a page --
without using block colors. Here's what I meant: This
paragraph is in a table that has a background color and no
border. I find that using a table instead of a block for
adding color is easier to maintain when I change my
pages, because I always know exactly where the limit of the
color will be.
|
Cell Properties
Go ahead and reopen the "Table Properties" window for a table, but
this time select the "Cells" tab. There are quite a few options,
aren't there? I'll explain each of them here.
 Selection
 - You can specify just the cell that the cursor is in, or the
row or column that the cell is in, here. To jump from cell to
cell, row to row, or column to column, click on the
"<Previous" or ">Next" buttons. Try this out for yourself
in Composer and watch how each cell, row, or column is selected.
- Height
- The minimum height of the cell (and all cells in the same row,
for that matter, even if you don't select "row") in pixels or as
a percentage of the table height. Note that this size value is
usually "advisory" to a browser, in the sense that a browser
will override this setting if the browser thinks that the the
contents of the table cells require a different size.
- Width
- The minimum width of the cell (and all cells in the same
column, for that matter, even if you don't select "column") in
pixels or as a percentage of the table width. Note that, like
cell height, this size value is advisory to a browser, in the
sense that a browser will override this setting if the browser
thinks that the the contents of the table cells require a
different size. (Some versions of Composer require you to have
text in the cell prior to changing the width.)
- Content Alignment
- The alignment of the contents of the cell: top, middle, or
bottom; left, center, or right. It works on text and images in
the cell.
- Cell Style
- "Normal" or "Header". Header style cells are intended to be
used as column headers. The interpretation of "Header" varies
from browser to browser, but usually the text in Header cells is
automatically bold-faced. There's no guarantee of this, however, so I
recommend ignoring the "Header" option and just setting the
fonts in header cells the way that you want them to look.
- Text Wrap
- If this box is unchecked, or checked and "Wrap" is selected,
when the text in the cell reaches the width of the cell then it
will automatically start on a new line. This allows the browser
flexibility in determining how wide to make a column. But
sometimes we want to break text only at a certain point. In that
case, check the box and select "Don't wrap", which means that
text won't wrap to another line unless we insert a line break.
The size of each column will increase to accommodate the longest
line of text within a cell in the column.
- Background Color
- Just like you can select a background color for an entire
table, you can select the background color for each row, column,
or cell independently. The cell spacing will always show the
table background color. If you make your table have a zero-width
border and cell spacing also set to 0, the cells will seem to
touch each other, making a kind of image. If you set a
background color and later want to remove it entirely and let
the table color show through, select the "default" color (i.e.,
the "Default" button in the "cell background color" window that
opens when you select a color. You can also simply right-click
and select "Table or cell background color".
This table
|
has cells with
|
| different |
colors.
|
|
Same table
|
with a border width
|
and cell
|
spacing of 0
|
|
For practice, use Composer
to make a table like this colorful 5 x 9, 900 pixel wide
table.
- Use a border of 0 and spacing of 2 to get the empty
space between the cells.
- Also be sure to set the width of each cell that has
text to 100 pixels after you insert
the text. (If you do it before there are any cell
contents then Composer might ignore you.)
- Also set the width of the columns that have only
empty cells to 100 pixels (you can set the width of
just one cell in each column). If you change
the width in the empty cells but nothing happens,
you may need to type a space character in each cell
before you set the width.
- Don't worry if the cells that you type in suddenly
get very wide before you change the cell width.
- Be sure to view your web page in different browsers
to see if there is any difference in how the table
looks.
|
Now,
take a look at the Kehilalinks
site
for Orhei for an idea about how you can use a table
like this as a navigation menu for your web site.
|
Centering a
Table So It Will Work in Internet Explorer pre-Version 11
(optional)
The HTML standard is constantly changing. Even when it is set,
however, like many computer standards, it may still be somewhat
ambiguous, so each browser may interpret HTML commands
differently. Furthermore, in the past, some organizations have
chosen to ignore the standard, or to create their own HTML
commands that work in their own browsers, but not in others. For
example, older versions of Internet Explorer (IE) were notorious
for being incompatible with standards. One example of this is
that older versions of IE don't recognize commands for
page-centered tables. That's right: you can center a table in a
page using Composer, and that table will be correctly displayed
in the center of the page in SeaMonkey, Firefox, Chrome, and
even Microsoft Edge (Microsoft's replacement browser for IE),
but not in IE. That is not so much of a problem nowadays: All
versions of Windows pre-Windows 7 are now end-of-life and no
longer supported by Microsoft, plus many home users who have
Windows 7 have taken the free upgrade to Windows 10 (that uses
Edge) or updated to IE 11, so there is only a relatively small
and shrinking population of users who still use older versions
of IE.
But if you want to be sure your web pages look the same in older
versions of Internet Explorer (and if you don't want to worry
about this then that is completely understandable), here is a
trick.
The trick is to put the table that you want centered into
another table that occupies 100% of the window:
- Create a 1x1 table that is 100% width of the window.
- Insert the table you want centered into the single-cell
table. In this case I inserted a 2x2 100 pixel table. I gave
it a different background color so it is easier to see.
- Set the horizontal content alignment of the single cell in
the outer table to "Center". IE will apply this
command to the inner table and center it, but SeaMonkey does
not! On one of my really old computers, for example, the
green table here is centered in IE 8, but not in SeaMonkey.
- If the inner table is not automatically centered in
Composer, set the table alignment property of the inner
table to "center". That will center the inner table when you
view it in SeaMonkey AND in the older versions of IE.
- Then you can set the border of the outside table to 0 and
let the page background show through so that the outside
table is invisible.
If you have access to a Windows system that is running an older
version of IE (viz., the no-longer-supported Vista or even XP,
but also Windows 7 where the owner has not updated the browser),
take a look at this lesson page to see if it looks any different
than it does in SeaMonkey/Firefox/Chrome/Safari/etc.
This is yet another example of why it is so important to test
things in more than one browser.
Anyone who doesn't have access to an
older Windows machine, make careful note, because you won't be
able to see the difference, so you'll just have to remember!
Background
Images in Tables
Just as with pages, you can use either a background color or a
background image in tables. You can then add text to images by
using an image as the background in a cell and then inserting
text into the cell. Here's an example using these two images:


And just as a browser tiles a page background image to fill the
entire page, so will it tile a background image in a table (or a
single cell).
To add a background image to a table, or cell within a table,
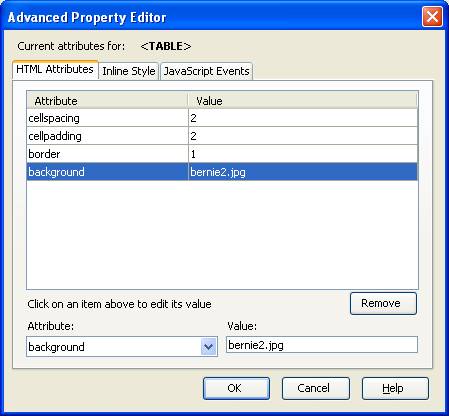
open the "Table Properties" window. To add a background image to
an entire table, in the "Table" tab click on the "Advanced Edit"
button. This will open the "Advanced Property Editor" window.
In the "Advanced Property Editor" window, click on the "HTML
Attributes" tab and
type (this isn't one of the
pre-defined attribute selections so you can't just choose it)
the word "background" (without the quotes). For the
"Value:", type the URL of a file to use as a background image.
If the image file is in the same folder as the page, you can
type just the name of the file, as shown in the example. Note
that there is no "URL is relative" box to check, as there is
when inserting images.
You can also add background images to a single cell. In the
"Table Properties" window, click on the "Cells" tab. Select just
the cell, not the column. Then click on the "Advanced Edit"
button and add the attribute and value just as you would for the
entire table.
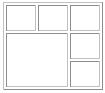
Cells that Span
Multiple Rows and Columns
The tables that we have been using up until now were pretty much
simple grids of rows and columns. In web pages, however,
individual cells can also span multiple rows and columns. One
place where this is useful is in creating multiple levels of
headings for a table. For example, here is the top few rows of
a U.S. Department of Internal Revenue Tax Table. Take a
look at how this table might look in a web page (ignoring, if you
are an accountant, the actual dollar amounts shown here):
| Tax Table |
| If Form
1040A, line 24, is-- |
And you
are-- |
| At least |
But less than |
Single |
Married filing jointly |
Married filing separately |
Head of a household |
| Your tax is-- |
| $0 |
$5 |
$0 |
$0 |
$0 |
$0 |
In this table, notice how the first row contains just one cell that
spans the entire width of the table -- 6 columns -- while the second
row has two cells, one of which spans two columns and the other
spans 4 columns. Also note how the cells containing the words
"At least" and "But less than" span two rows. 
To merge multiple cells into a single cell like this, select the
multiple cells by left-clicking in one and, while holding the left
mouse button down, dragging the mouse to select multiple cells. The
selected cells should have a different outline color (blue on my
computer) to indicate that they are selected. When you have selected
the cells that you want to merge, let go of the left mouse button
and now right-click
(control-click on single-button Macs) in any of the selected
cells and choose "Join Selected Cells". You should see that the
cells that you selected have been merged into one cell.
Adding a Caption
to a Table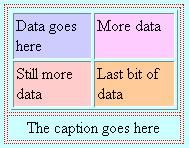
There are several ways to add a text caption to a table. One of
the ways is the Composer "captions" feature, but there are other,
more reliable ways. The captions feature, however, is useful for
more than just captions.
Composer "Caption"
Feature
The Composer table caption feature doesn't always work the way
you think it will. Here are the four locations you can put a
caption, above a table, below a table, left of the table, and
right of the table. As you can see, in SeaMonkey and Firefox, at
least, left and right are the same as top and bottom,
respectively.
|
|
Caption
to left
|
Caption to right
|
Take a look at his page in browsers other than SeaMonkey and
Firefox. In Microsoft Edge and Chrome it looks much the same,
except there is an extra blank line between where it says "Caption
to left" and the table. This is due to the specific HTML that
Composer generates and how that is interpreted by the browsers. So
the "captions" feature is not entirely reliable.
Other Ways to Add
a Caption to a Table
You can also make captions using a table cell. There are two ways
to do this. One is to create a table with one column and two rows.
Put your "real" table -- the table with the actual data -- in the
top cell (you can put a table in table, remember) and put your
caption in the bottom cell. (Or put your real table in the bottom
cell and put your caption in the top cell, if you want your
caption on top.) Set the height and width of the inner table to
"100%" of the height and width of the cell it is in. In the outer
table, change the border width to 0 so there is no visible border.
This is what it looks like:
| Data goes here |
More data
|
Still more data
|
Last bit of data
|
|
The caption goes here
|
You can also make a caption by making a table where all of the
cells in the bottom (or top) row are merged, but there is no way
to avoid a border around the caption if you want the table to
have a border.
| Data goes here |
More data |
Still more data
|
Last bit of data
|
The caption
goes here
|
Using Captions to
"Rescue" Table Cells that Contain Other Tables
If you've deleted the line break in a cell that contains just an
inner table, and if you later want to select that cell, but can't,
you can still "rescue" the cell by first adding a caption to the
inner table. This works because the HTML that implements the
caption includes a line break! Then you can select that cell, make
your changes, and delete the caption so the table again occupies
the entire cell.
Picture Thumbnails
Another excellent use of tables is to organize picture thumbnails.
Pictures are generally too large to put many of them on one web
page, but if you have a lot of pictures on separate pages then it
can take a long time for someone to look through them all and find
ones that they really want to look at. To make your pictures easier
to browse, create
smaller versions of the image files, called "thumbnail"
images (you can use IrfanView or another image editing program), and
put the thumbnails and captions for them in a table on one page.
Then add links from the thumbnail images to pages that have the
full-size images.
An example of this is in the Kehilalinks
page for Przemysl
(http://kehilalinks.jewishgen.org/Przemysl/PHOTOS/show_postcards.shtml).
Note that each of the small images on this page is not simply a large
image with its dimensions reduced, it is a separate very small
file. Links on the small files connect them to larger
versions of the images.
One of the things that I especially like about this site is that the
larger images are on real pages -- that the links are not just to
the image files themselves -- and each of the pages that has a
full-size image has a title and caption. It can take quite a bit
more work to do this if you have a lot of images, but it makes the
site look much more polished.
Assignment
Now that you know how tables work, can you spot where the developers
used tables on other web sites? You can get ideas about how to use
tables by looking at the many ways that other Kehilalinks web
masters have used them. Here are some Kehilalinks pages that use
tables to organize text and photos:
http://kehilalinks.jewishgen.org/BialyGen/
http://kehilalinks.jewishgen.org/Belchatow/
http://kehilalinks.jewishgen.org/Sanok/
http://kehilalinks.jewishgen.org/Nowy_Sacz/
http://kehilalinks.jewishgen.org/Suwalki/Suwalki.htm
You'll have realized by now that the template that I've been using
for class assignments and that many of you have continued to use,
contains several tables. One table at the top of the page, where the
logo and Kehila name are, has one row and two columns. Another table
has one row and three columns: the left cell of that table contains
a third table that has places for the links to other pages on the
site (and to Kehilalinks and JewishGen).
Your assignment is to add at least one table (one additional table
if you are using the template) to your site and to change the
attributes of the table or cells (you can add a background color,
change the size, etc.).
For example, I've removed the borders and added some background
colors to the tables to make them stand out better in my Kamen
Kashirskiy site. I've also added a table that contains some
thumbnail images to my pictures page. You can what I've done at http://kehilalinks.jewishgen.org/class/kc-8.html.
Compare that to the previous version at http://kehilalinks.jewishgen.org/class/kc-5.html.
Copyright © 2009, 2010, 2012, 2013, 2014, 2016 Mark
Heckman. All rights reserved.